
Device theft in Nigerian university hostels is a devastating reality. Every academic semester, students wake up to empty desks, missing phones, and vanished laptops. While losing an expensive electronic gadget hurts financially, the digital loss is far worse. Hardware can be replaced with money. You cannot easily replace nine months of final-year project drafts, lab results, seminar slides, and code repositories. Losing your primary device weeks before project defense can force you to repeat an entire academic session. Hence, securing your laptop and smartphone in a Nigerian hostel is a must!
Hostel rooms are high-traffic transit points. Roommates invite friends, coursemates form impromptu study groups, and campus technicians walk in and out. Generic security advice like “lock your door” or “hide your bag under your mattress” fails completely in these chaotic environments. You need a defense-in-depth approach.
This comprehensive guide delivers a layered physical and digital security framework. By combining physical hardware anchors, firmware barriers, full-disk encryption, and real-time cloud redundancy, you will make your devices virtually theft-proof and protect your academic work against catastrophic loss.
Layer 1: Physical Defense and Anti-Theft Hardware
Physical access remains the easiest pathway to device theft. A thief only needs ten unsupervised seconds to slip a phone into their pocket or slide a laptop into a backpack. You must eliminate opportunistic grabs by securing the physical hardware directly. Here are steps to securing your laptop and smartphone using physical defense and anti-theft hardware:
1. Anchor Your Laptop with a Kensington Cable Lock
Most modern laptops, external monitors, and desktop towers feature a Kensington Security Slot (K-Slot). This small, metal-reinforced rectangular hole connects to a steel cable lock.
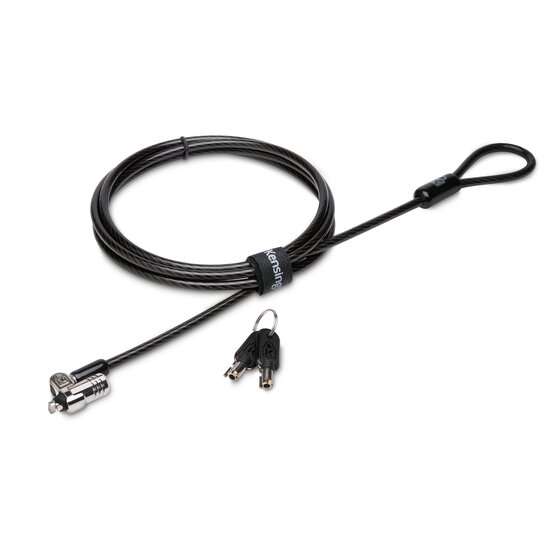
- Loop the heavy-duty steel cable around an immovable piece of hostel furniture, such as a heavy steel bedframe or a solid reading table.
- Insert the lock head into your laptop’s Kensington slot.
- Turn the physical key or set the numerical combination to lock it in place.
Even if you step out of your room to fetch water or use the bathroom, an intruder cannot simply grab your laptop off the desk. Cutting through a braided steel cable requires heavy bolt cutters. Petty thieves will quickly abandon an anchored device to avoid creating suspicious noise.
You can get a Kensington Cable of your choice here from the official company website.
2. Eliminate Smartphone Vulnerabilities During Group Study and Charging
Smartphone theft in hostels spikes during public charging sessions and power outages. Avoid plugging your phone into extension boxes placed near open windows or communal reading room hallways.
- Use Short Charging Cables: Avoid long cords that let your phone rest far from your personal desk space.
- Invest in a Portable Power Bank: Charge your power bank at common wall sockets instead of your primary phone. Keep your smartphone in your pocket or backpack while it draws power from your power bank.
- Never Leave Devices on Silent Mode While Sleeping: Enable loud ringtones and configure emergency alert tones. If someone attempts to unplug your device, motion-activated anti-theft alarms will sound instantly.
3. Record Hardware Identity Markers
Before setting foot in a hostel, document every permanent identifier on your electronics:
- Find your laptop’s serial number on the bottom chassis or by running
wmic bios get serialnumberin the Windows Command Prompt. - Dial
*#06#on your smartphone to display your unique 15-digit International Mobile Equipment Identity (IMEI) number. - Capture the Media Access Control (MAC) address of your device’s Wi-Fi card.
Write these numbers down in an analog notebook. Store a digital copy in an email draft. If your device is stolen, campus security and law enforcement require these exact numbers to track the equipment or claim it if it is recovered.
Layer 2: Firmware and OS-Level Lockdown

A thief who steals an unprotected laptop will immediately attempt to wipe the operating system. They create a bootable Windows installation USB flash drive using another computer. They insert the flash drive into your laptop, reboot, wipe your hard drive partitions, and install a fresh copy of Windows. Finally, they then sell your laptop on the second-hand market within hours.
You can stop this tactic entirely by securing your computer’s Unified Extensible Firmware Interface (UEFI) or Basic Input/Output System (BIOS).
Step-by-Step Guide to Securing Your Laptop and Smartphone: Locking Down the BIOS/UEFI
Setting an administrator password on your motherboard prevents anyone from changing your system’s boot order or booting from an external USB drive.
- Shut down your laptop completely.
- Press the power button and immediately tap your manufacturer’s BIOS key repeatedly. Common keys include F2 (Dell, Acer, Asus), F10 (HP), F12 (Lenovo), or Del (custom motherboards).
- Navigate to the Security tab using your keyboard arrow keys.
- Locate the Set Supervisor Password or Set Administrator Password option.
- Create a strong, memorable alphanumeric password. Do not forget this password, as resetting a motherboard password requires opening the laptop chassis and shorting circuit pins.
- Navigate to the Boot tab.
- Disable Boot from USB or rearrange the boot priority list so the internal Solid-State Drive (SSD) or Hard Disk Drive (HDD) is locked as the first and only boot option.
- Enable Secure Boot to prevent the execution of unauthorized operating systems or diagnostic tools.
- Press F10 to save your changes and reboot your computer.
With this protection active, a thief cannot boot your laptop from a bootable flash drive to wipe the drive. The laptop becomes a useless brick unless they provide the supervisor password.
3. Configure Aggressive Screen Timeout Rules
Never leave an unlocked operating system open on your desk. Configure aggressive lockout policies across your platforms:
- Windows:
- Navigate to Settings > Accounts > Sign-in options. Set Require sign-in to Every time.
- Go to System > Power & battery and set the screen turn-off timer to 1 minute on battery and 2 minutes on power.
- Train yourself to press Windows Key + L every single time you stand up from your chair.
- macOS:
- Go to System Settings > Lock Screen. Set Require password after display turns off or screen saver begins to Immediately.
- Set your display sleep timer to 2 minutes.
- Use the shortcut Control + Command + Q to lock your screen instantly.
- Android/iOS:
- Set your auto-lock timer to 30 seconds.
- Disable lock screen notification previews for banking alerts, OTPs, and authentication apps to prevent eavesdropping.
Layer 3: Real-Time Tracking and Remote Kill Switches
If a device leaves your possession, automated tracking services provide your best opportunity to pinpoint its location or destroy sensitive data before an attacker accesses it. This way, you are securing your laptop and smartphone well.
1. Activating Windows “Find My Device”
Windows includes a built-in tracking module that periodically uploads your laptop’s location to your personal Microsoft account.
- Sign in to your computer using a personal Microsoft account rather than a local offline account.
- Open Settings > Privacy & security > Find my device.
- Toggle the Find my device switch to On.
- Enable location permissions by navigating to Settings > Privacy & security > Location and toggling Location services to On.
If your laptop goes missing:
- Visit account.microsoft.com/devices on any web browser.
- Select your missing computer from the list and click Find my device.
- View the map coordinates showing the last known Wi-Fi network connection.
- Click Lock to terminate all active sessions, lock out local users, and display a customized recovery message with your contact details on the screen.
2. Hardening Apple’s “Find My” Network
Apple provides the most resilient consumer tracking ecosystem on the market because it uses an encrypted mesh network of nearby Apple devices.
- Open System Settings on your Mac or Settings on your iPhone/iPad.
- Tap your Apple ID name at the top of the menu.
- Select Find My.
- Toggle Find My Mac/iPhone to On.
- Enable Find My network. This setting allows you to track the device even when it is offline, powered down, or disconnected from the internet.
- Enable Send Last Location to automatically broadcast the device’s coordinates right before the battery dies completely.
If stolen, navigate to icloud.com/find. You can trigger an alarm, activate Lost Mode, or click Erase Mac/iPhone to completely wipe all onboard storage chips remotely. Because of Apple’s Activation Lock, the device remains tied to your Apple ID even after a wipe, rendering it useless for resale.
3. Setting Up Google Find My Device on Android
Google’s expanded Find My Device network helps locate smartphones, tablets, and paired accessories using millions of participating Android devices.
- Open Settings > Google > Find My Device.
- Toggle Use Find My Device to On.
- Tap Find your offline devices and select With network in all areas to leverage nearby Android phones for crowdsourced Bluetooth tracking.
- Ensure your phone’s primary location service is active under Settings > Location.
If your phone vanishes:
- Go to android.com/find or download the Find My Device app on a coursemate’s phone.
- Log in with your Google account.
- Track the real-time position.
- Use Secure Device to lock the screen and force a logout from your Google services.
- Use Erase Device as a final resort to execute a remote factory reset.
Layer 4: Full-Disk Data Encryption (BitLocker and FileVault)
Many students believe that their Windows login password protects their local files. This is a dangerous misconception.
A thief does not need your Windows PIN or password to read your files. They can unscrew the back panel of your laptop in two minutes, remove the M.2 NVMe SSD or 2.5-inch hard drive, slip it into a ₦5,000 external USB drive enclosure, and plug it into another computer. That external drive will show up as a secondary storage device. The thief can browse your entire C:\Users\ folder, copy your private photos, read your banking PDFs, and steal your source code.
Full-disk encryption makes this physical drive bypass completely impossible. When you encrypt a disk, the operating system converts every stored byte into unreadable ciphertext using AES-128 or AES-256 encryption. Without the mathematical cryptographic key, a pulled hard drive shows up as completely unformatted, scrambled digital garbage.
How to Turn on Windows BitLocker (Windows Pro/Enterprise/Education)
BitLocker is Microsoft’s enterprise-grade encryption tool. It uses your computer’s onboard Trusted Platform Module (TPM) chip to lock the encryption keys directly to the physical motherboard.
- Press the Windows Key and type Manage BitLocker. Press Enter.
- Click Turn on BitLocker next to your primary operating system drive (usually drive
C:). - The system will verify that your laptop has a TPM 2.0 security chip active.
- Choose how to back up your recovery key:
- Select Save to your Microsoft account (essential for easy cloud recovery).
- Select Print the recovery key or Save to a file (save this text file to a secure, private USB flash drive that stays at home, never in your hostel).
- Choose Encrypt used disk space only (faster for newer setups) or Encrypt entire drive (slower, but covers deleted and slack space).
- Select New encryption mode (XTS-AES), which provides advanced cryptographic defense for fixed drives.
- Check the box labeled Run BitLocker system check to confirm that the decryption key will release properly upon reboot.
- Click Continue and restart your computer.
If an unauthorized user removes your encrypted SSD, the drive demands the 48-digit BitLocker Recovery Key upon connection to another computer. Without that key, your academic data remains mathematically impenetrable.
Note for Windows Home Edition Users: If your laptop runs Windows Home, you may not have access to full BitLocker. Instead, open Settings > Privacy & security > Device encryption and turn on Device encryption, which provides baseline TPM-backed encryption.
How to Turn on macOS FileVault
Apple simplifies full-disk encryption through FileVault.
- Open System Settings.
- Scroll to the sidebar and click Privacy & Security.
- Scroll down to the FileVault section.
- Click Turn On.
- Choose whether to allow your iCloud account to unlock your disk or generate a unique local recovery key. If you select a local key, copy the 24-character alphanumeric string onto paper and store it securely away from your dorm.
- Restart your Mac to begin the background disk encryption process.
Layer 5: Automated, Zero-Touch Cloud Backups
Even the tightest defense framework cannot stop a targeted robbery or an accidental dormitory fire. Hardware can disappear. Therefore, your ultimate survival metric is your recovery time: how quickly you can sit at a cybercafé or borrow a coursemate’s laptop and continue working on your thesis without skipping a beat.
You must build an automated, zero-touch synchronization engine. Manually copying files to a USB drive once a week fails because human beings get lazy, tired, or forgetful right before major project deadlines.
Configure OneDrive Folder Redirection (Windows)

Microsoft OneDrive integrates directly into the Windows file directory. You can configure it to back up your primary working directories in real time.
- Click the OneDrive cloud icon in your Windows taskbar notification area.
- Click the Gear icon (Settings) > Settings.
- Navigate to the Sync and backup tab.
- Click Manage backup.
- Toggle the switches for Documents, Pictures, and Desktop to On.
- Click Save changes.
Every time you hit Ctrl + S in Microsoft Word while working on your thesis inside the Documents folder, the changes upload silently in the background whenever your laptop connects to an internet connection or mobile hotspot.
Automate Google Drive for Desktop (Windows & Mac)
If you prefer the Google Workspace ecosystem, download the standalone client instead of using the web interface.
- Download and install Google Drive for Desktop from (
https://google.com/drive/download). - Launch the app and sign in with your primary Google account.
- Open the app preferences and click My Computer > Add folder.
- Select your primary academic workspace folder (e.g.,
C:\Academic_Projects\Final_Year_Thesis). - Choose Sync with Google Drive.
The Google Drive client actively monitors that directory for file updates. It immediately mirrors changes to your cloud drive.
Leverage Version History to Defeat File Corruption
Automated cloud tools provide an essential secondary benefit: version control. If a roommate accidentally edits and breaks your Excel dataset, or if a malware script corrupts your Word document:
- Open the file in OneDrive or Google Drive on your web browser.
- Right-click the document and select Version History.
- Browse past revisions down to the minute.
- Click Restore to roll back your file to a healthy state.
Action Plan: The First 30 Minutes After a Theft
If an incident occurs despite your precautions, execute this immediate response plan:
| Time Elapsed | Action Step | Target Platform |
|---|---|---|
| 0 – 5 Minutes | Trigger remote lock or data wipe | (https://icloud.com/find), (https://android.com/find), or (https://account.microsoft.com/devices) |
| 5 – 15 Minutes | Revoke active login sessions on all email accounts | Gmail / Outlook Account Security Dashboards |
| 15 – 25 Minutes | Change critical banking, school portal, and messaging passwords | Bank apps, JAMB/CAPS portals, WhatsApp |
| 25 – 30 Minutes | File an incident report with hardware identifiers | Campus Security Unit and Police Station (provide IMEI/Serial No.) |
Final Security Audit Checklist
Before you head out to lectures tomorrow morning, confirm that your devices pass this security audit:
- Laptop secured with a Kensington cable lock or locked in a metal trunk.
- Motherboard BIOS/UEFI locked with a strong Administrator Password.
- USB Boot disabled in the boot sequence menu.
- Screen auto-lock timer set to 2 minutes or less.
- Real-time location tracking active on Find My Device/Apple Find My.
- Full-disk encryption (BitLocker or FileVault) turned on and verified.
- Project directory syncing automatically to OneDrive or Google Drive.
- Device serial numbers and IMEI codes documented in an offline notebook.
Which layer of this security framework will you implement first on your laptop today? Have you already set up automated cloud sync for your critical project files, or are you still relying on manual USB flash drive transfers? Share your current hostel security routine or drop any technical setup questions in the comments below!
Recommended:
How Students Are Making Money Through Tech in Nigeria
Student Builds App That Solves UNILAG Hostel Crisis
15 Fully Funded Scholarships in the USA for International Students Without IELTS